Purpose of this Project
For our Project Lead The Way (our engineering class) we have to design a ropes course for Butler State Park in Carrollton, Kentucky. In our team we have three teammates from Kentucky and three from Minnesota. We used Autodesk Inventor to design our parts and to assemble our final assembly. We will blog daily to keep track of each others process. If you any questions, feel free to contact us.

Communication
Communication is one of the biggest parts of this project. Without communication we would have not been able to finish the project. Our group first communicated through Skype and Face Time, but we then realized that was not always going to work. So we made a group via text, this was our main source of communication.
Define Problem
The first step of the design process is define the problem, during this step you identify the problem, validate the problem, justify the problem and create design requirements. For this step of the design process we started by finishing 9.4 which includes all the rules and requirements for the project. As team we started to think about what are ropes course was going to look like and how we wanted it to function (high or low ropes course).
Generate Concepts
During the second step of the design process you research, brainstorm possible solutions, Consider additional design goals, apply STEM principles, select an approach and use decision matrix. Our group decided it would be best if we individually researched high rope courses and possible obstacle options after we finished the decision matrix. We each have a separate document for research and have a conjoined document that allows us to see each others ideas.
Decision Matrix
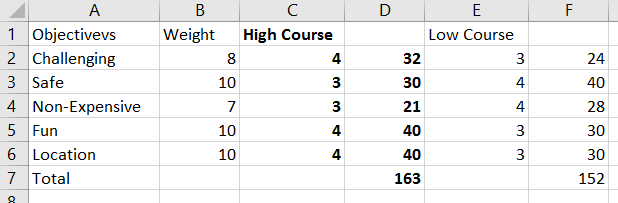
|
Brainstorming and Research
|
Develop a Solution
During the third step in the design process during this step you create detailed design solution, justify the solution path and use technical drawings. During this part in the design process we discovered a location that we wanted to use for our ropes course. We also found a design we wanted to use and made dimensions making sure it should work in the area we picked.
Location
We chose to pick an area that was open because we didn't want to have to work with trees, knowing that may make the final product more expensive.
|
Dimensions and Design
|
Construct & test Prototype
During the fourth step of the design process you construct a testable prototype, plan prototype testing, test prototype and test report. So during this step we worked on finishing our obstacles and other Inventor parts that were assigned to us. We also finished the assembly during this step.
Obstacles
|
Assembly

Here is our assembly, as of right now it has 10 obstacles. Once our other group member finish's their obstacle we plan to add them to the assembly.
|
Evaluate Solution
During the fifth step of the design process, you evaluate solution effectiveness, reflect on design, optimize/Redesign the solution and project recommendations. So during this step we made the necessary changes to our obstacles, so we could improve our ropes course. For example we changed out parts so the material we would use if we were to make the obstacle. We also reflected on how we thought we did, overall we believe that we were successful.
Changes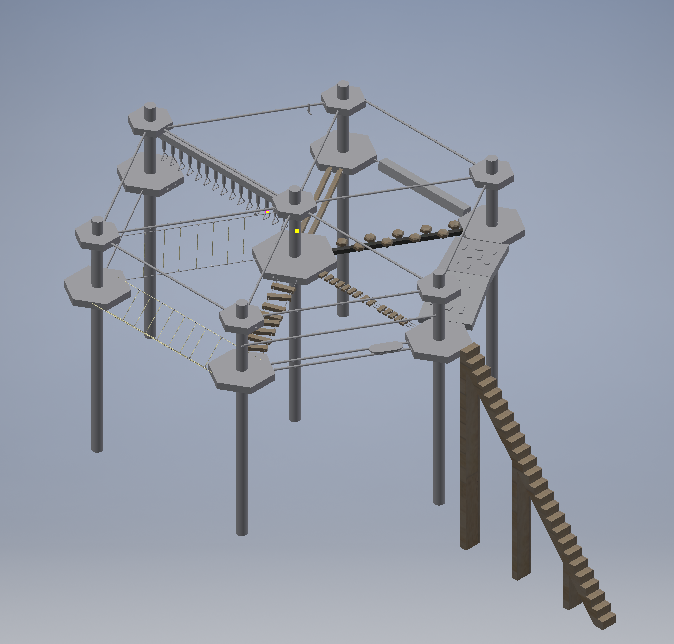
We only made a couple changes to the final assembly, we added two of Hannajo's obstacles. Catie made a small change to her skate obstacle, which is a rope that help people pull themselves across to the other side.
|
Exploded View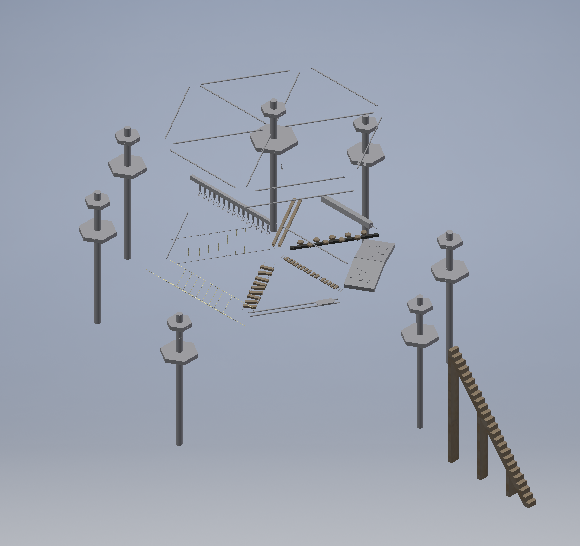
Dimensions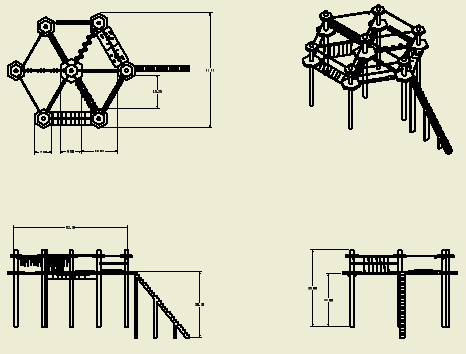
|
Present Solution
During the last step of the design process you document the project and communicate the project. So as a team we made a PowerPoint and a video so we could advertise our rope course.
